
dWeb User program: Main tutorial on downloading, installing and running
1. Downloading and installing
The Decentralized web / dWeb program is available currently for 3 platforms - Windows, Mac OS X, and Linux.
The utility for 64bit Windows was created and tested on Windows 7 and Windows 10. It is available for download on this link as a setup executable file -
dweb-rel2a-windows64.exe
After downloading and saving the file to an appropriate folder please double click on file or open a 'command prompt' window, go to the folder
and type -
> dweb-rel2a-windows64.exe
The setup program goes through installation and places files in the - 'c:\dweb' directory.
The program is started at boot time. It can also be started though:
- Start -> Programs -> dweb ->
- or, in 'file manager', in the 'c:\dweb' directory double click on - dweb2.exe
- or, open 'command prompt' and run - > c:\dweb\dweb2.exe
The utility for Mac OS X was created and tested on Mac OS X 10.11 / El Capitan and Mac OS X 10.15 / Catalina. It is available for download on this link as a self-extracting file -
dweb-rel2a-macosx.run
After downloading and saving the file to an appropriate folder please open a 'terminal' window, go to the folder and type -
$ chmod +x dweb-rel2a-macosx.run
$ ./dweb-rel2a-macosx.run
This will create a 'dweb' sub-folder in the '/Users/Shared/dweb' folder .
The program is started at boot time. It can also be started though 'terminal':
$ /Users/Shared/dweb/dweb2
or, in 'Finder' file manager, in the '/Users/Shared/dweb/dweb2' folder double click on - dweb2
The utility for 64bit Linux was created and tested on Ubuntu 18.04 and Ubuntu 20.04. It is available for download on this link as a self-extracting file -
dweb-rel2a-linux64.run
After downloading and saving the file to an appropriate folder please open a 'terminal' window, go to the folder and type -
$ chmod +x dweb-rel2a-linux64.run
$ ./dweb-rel2a-linux64.run
This will create a 'dweb' sub-folder in the '/home/
The program is started at boot time. It can also be started though 'terminal':
$ ~/dweb/dweb2
or, in 'file manager', in the '/home/
2. First time run - creating decentralized identity
When starting the dWeb program for the first time the user has to establish identity based on an e-mail address. You can find more details and information
about identity here -
User identity and inviting other users
After starting the dWeb program for the first time the 'terminal/command prompt' screen shows:
-------------------------------
dWeb Communications program
First time initialization: setting 'my id'
For identity details please check -
https://decentralizeweb.org/t6.htm
type e-mail as user id (up to 30 chars), ESC-exit -
-------------------------------
Type an e-mail address that you choose as identity for the dWeb program, like for ex. - paul.arssov@sbcglobal.net . The dWeb program will follow with:
-------------------------------
dWeb Communications program
First time initialization: setting 'my id'
For identity details please check -
https://decentralizeweb.org/t6.htm
type e-mail as user id (up to 30 chars), ESC-exit - paul.arssov@sbcglobal.net
sending an e-mail to validate / open and read the message, click on link to validate
type: a-choose another email, s-resend email, v-to validate, ESC-exit -
--------------------------------
Open your e-mail client or a web browser, and check the last messages that the chosen e-mail address , for ex. - paul.arssov@sbcglobal.net did receive.
There should be a message:

Click on the link in the message body - this will bring up a web browser or add a browser tab with the following message:

If no longer needed close the e-mail client and close the browser tab. Go back to the dWeb program and type 'v' to validate:
-------------------------
dWeb Communications program
First time initialization: setting 'my id'
For identity details please check -
https://decentralizeweb.org/t6.htm
type e-mail as user id (up to 30 chars), ESC-exit - paul..arssov@sbcglobal.net
sending an e-mail to validate / open and read the message, click on link to validate
type: a-choose another email, s-resend email, v-to validate, ESC-exit - v
e-mail validated
decentralizeweb.org - dWeb Project
for the way of use please open in a browser and check - ~/dweb/tutorial.htm
Operating system - Linux / Devices: audio input (microphone) - 1, audio output (speaker) - 3, video in (camera) - 2
Local IP address - 172.17.2.194, Global IP (web) address - 87.126.31.247,
My id - paul.arssov@sbcglobal.net, Status - present, direction - outward only
click over the image to bring main menu - 'connect', 'ads on/off', 'invite', 'exit'
------------------------
3. Reported and important details when the program is started
The next time the dWeb program is started it will bring only this message in 'terminal'/'command prompt', together with the main dWeb graphical screen:
-----------------
decentralizeweb.org - dWeb Project
for the way of use please open in a browser and check - ~/dweb/tutorial.htm
Operating system - Linux / Devices: audio input (microphone) - 1, audio output (speaker) - 3, video in (camera) - 2
Local IP address - 172.17.2.194, Global IP (web) address - 87.126.31.247,
My id - paul.arssov@sbcglobal.net, Status - present, direction - outward only
click over the image to bring main menu - 'connect', 'ads on/off', 'invite', 'exit'
------------------------
The dWeb program reports the operating system, and the number of audio input and out output devices detected.
Next it reports the local and global IP addresses. For details on this please check -
local and global IP address
The following line shows the e-mail address which was chosen and is used as identity for the dWeb program.
Finally and most importantly the dWeb program shows direction of communication - in this case it is outward only.
The so called here 'outward' IP communication is the standard 'client-server' mode of Internet communication.
While outward communication is always enabled and available for the user they can not receive inward request sent form another user residing outside
of the local network.
Still, it is possible for the user to enable inward IP communication.
For details on this please check -
outward and inward communication
testing outward and inward IP communication
enabling inward communication
4. Main menu
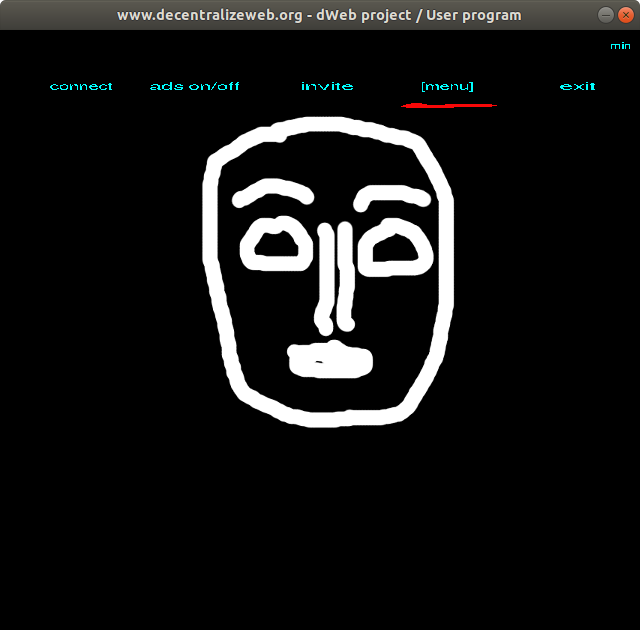
In addition to 'terminal'/'command prompt' window, When started the dWeb program shows this default graphical screen. A left mouse single click brings
the initial menu. The menu toggles on and off with mouse clicks.

The main items on the menu are -
- connect - shows a list of previously added contacts
- ads on/off - starts/stops showing of ads
- invite - send an e-mail to invite another person to start communicating
- exit - closes this program and exits
5. Adding contacts - sending invitations
Initially the 'connect' menu does not show any contacts. We have to send invitations to connect to other users of the dWeb program and then receive
and accept invitations from other users.
When moving the mouse cursor over 'invite' and then clicking the following sub-menu comes -

If a mistake in typing is made you can click on 'clear' then type again. To go further click on 'cancel' to exit the sub-menu, or 'ok' to go forward and
send an invitation to another user.
When the other user opens their e-mail client or a web browser to read their e-mails they will see a message with:
From: contact@decentralizeweb.org Subject: dWeb contact message
After opening of the message the user who got the email invitation will see this -
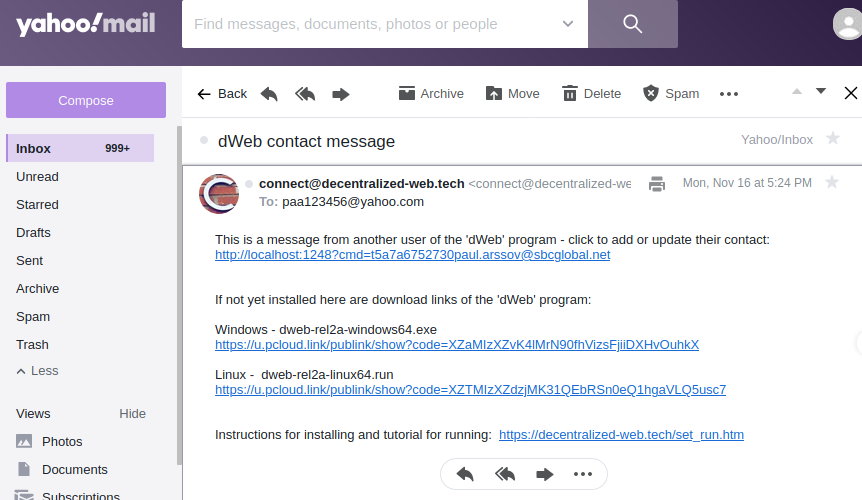
A user who did not have the dWeb program can get familiar with it by clicking on the link - Instructions for installing and tutorial for running.
Then the user, depending on their operating system, can click on one of the package links to download and then install the dWeb program.
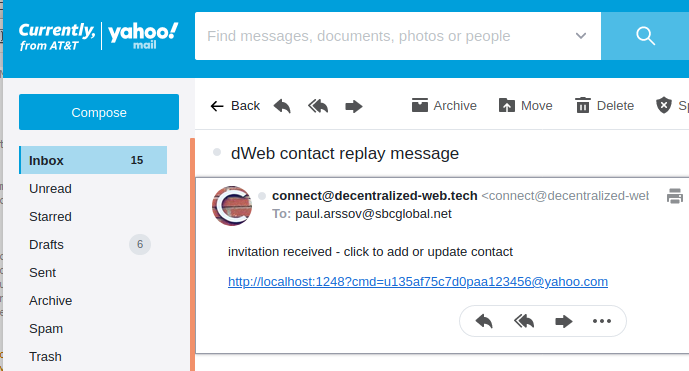
After saving of the received contact information an invitation replay e-mail is sent back to us as a confirmation for receiving our invitation and providing
us with a contact information of the other user.
When we open our e-mail client or a web browser to read our e-mails we will see a message with:
From: contact@decentralizeweb.org Subject: dWeb contact replay message
After opening of the message we will see this -
Provided that either we or the other user, or both of us have enabled inward type of communication we can call each other and start communicating.
6. Connecting with other users - starting video+audio chat
After inviting users, getting the invitation accepted and receiving and confirming an invitation replay, there should be several contacts stored.
After clicking on the 'connect' in the main menu a new screen comes showing all of the stored contacts. If having more than 24 contacts the user
can push 'next' and/or 'previous' to view the next or previous page with contacts listed.

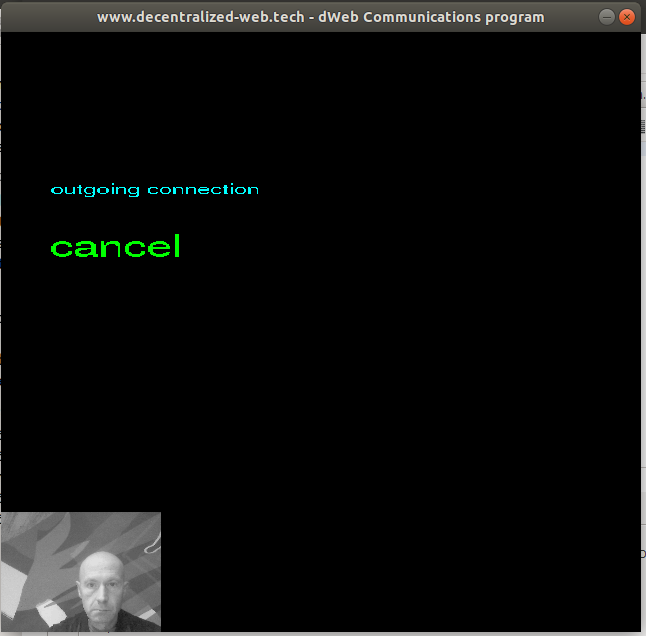
Clicking over one of the email addresses starts the connection sequence. The web camera is started and the local camera input is placed in the lower
left side of the screen. A message is placed on screen - outgoing connection request and a choice to cancel the request.
If the user on the receiving side of the connection request did not start the dWeb program the connection request will stop and
go to default screen after around 5 seconds.
If the user on the receiving side of the connection request did start the dWeb program they will get incoming connection request with message on screen -
to accept or reject the request.
If the user on the receiving side of the connection request does not do anything the incoming connection request will stop and go to default screen
after around 15 seconds.
In the same way the user who did initiate the connection request will get the request stopped and then go to the default screen after around 15 seconds.
If the user who did initiate the connection request clicks on 'cancel' , or the user on the receiving side of the connection request clicks on
'reject' both will get the request stopped and then go to the default screen right away.
If the user on the receiving side of the connection request clicks on 'accept' then both users will get video image from the other side placed on the
top side of the screen and will get and send audio / sound information.
Clicking on screen while the communication is ongoing will bring a message on screen - 'hang up'. Clicking on it will terminate the communication on
both sides.
7. Decentralized personal web site
When running the dWeb program, every user hosts their own web site which is visible to other users of the dWeb program. To find more about it please check -
Personal decentralized web site
The program comes with a default web site which looks like this -

8. Creating of a crypto-assets wallet
All users of the dWeb program get rewards in crypto-currency. In order to get rewards please check -
Creating of a crypto-assets wallet and viewing dWeb crypto-currency assets on a DEX (decentralized exchange)
The rewarded crypto-assets can be viewed and traded on a decentralized exchange / DEX -

9. Viewing ads
When started the dWeb program shows this default screen. A left mouse single click brings the initial menu.
 Click on 'show ads' - this will bring the image of an ad, which can have from 1 to 5 pages.
Wait for 10-15s without doing anything. This will cause a timeout in the ads viewing and bring back the default screen. Do a left mouse single click to
bring the initial menu and click again on 'show ads'.

Go over to the bottom/action area and click over '-->' . This will bring either the next page of the same ad or the next ad.
Go over to the bottom/action area and click over 'skip' - this will bring the next ad. Go over and click '-->' and '<--' -
this will bring next or previous page of the ad.
Go over to the left side of the bottom/action area and click over the action text. For the 5 pages ad the action text is - "Platform details".
This will result in bringing up of a new tab in Google Chrome web browser and loading the "action-url" page which is:
"https://decentralizeweb.org/ad5.htm".
Support our project - become our patron on Patreon:
![]()
Back
Software release:
User software - tutorial on download, install and use
|||||| Downloads -
![]()
![]()
![]()
Bridge software - install and use
|||||| Downloads -
![]()
![]()
Email:
![]() Discord:
Discord:
![]() Twitter:
Twitter:
![]() LinkedIn:
LinkedIn:
![]() Instagram:
Instagram:
![]()